3 Of The Most Beautiful Hikes In The Dolomites
The Dolomites! Just the name makes you imagine jagged, rocky peaks rising majestically, lush, green meadows and sparkling, turquoise lakes. If you're planning an adventure to this UNESCO World Heritage site, strapping on your hiking boots is non-negotiable.
While theres's no shortage of hikes in the Dolomites, we get it, if you have limited time, you want to do the most beautiful hikes in the Dolomites.
Table of Contents
3 of the Most Beautiful Hikes in the Dolomites Map
We've added the hikes, trailheads and parking to a map so that you can navigate to them easily. You can also see how closely located they are so you can easily visit these on a road trip in the Dolomites.
1. Tre Cime di Lavaredo: The Most Iconic

The Tre Cime di Lavaredo (Three Peaks of Lavaredo) are undoubtedly the most recognisable mountains in the Dolomites, it is the symbol of the Dolomites after all!
The classic circular hike around their base is an experience you won't forget and in our opinion is an unmissable hike if you're visiting the Dolomites for the first time.
The Classic Loop: Rifugio Auronzo to Rifugio Lavaredo & Beyond
- Starting Point: Rifugio Auronzo (accessible via toll road or long hike from Lago di Antorno).
- Alternative Starting Point: Start from Lago di Antorno to avoid the toll road this does add around an extra 400m elevation
- Distance: Approximately 9-10 km (5.6-6.2 miles) for the main loop.
- Elevation Gain/Loss: Around 400-500 meters (1,300-1,600 feet) total, as the path has gentle undulations.
- Difficulty: Moderate. The path is well-maintained and relatively wide, but involves some steady uphill sections and a few rocky parts. Suitable for most hikers with average fitness. It can also get busy so expect to be trundling behind people at points.
- Time: Allow 3-4 hours of walking time, plus stops for photos and refreshments.
The Hike: The most popular route is a moderate loop that takes you directly beneath these colossal rock formations. The path is well-maintained, offering varying perspectives of the peaks and stunning views of the surrounding landscape.
Combining Adventures: For those seeking an extra dose of drama, consider adding a detour to the Cadini di Misurina viewpoint. This incredible spot offers a view over to the spikey Cadini mountains. In our opinion, this view alone is one of the most beautiful in the Dolomites.
It's a relatively short (approx. 1 hour return) but steep side-hike from the main Tre Cime loop, well worth the effort for photographers and view-seekers. If you don't have a head for heights you probably won't want to walk out on to the viewpoint, a thin strip of path overhanging from the main path.
You can also explore further from the main path to find a fascinating cave, adding another layer of discovery to your journey.
Insider Tips for Visiting Tre Cime: Access & Parking:
- The Challenging Hike Up: You can park at the bottom, near the beautiful Lago di Antorno, and hike all the way up to the Rifugio Auronzo (the starting point for the Tre Cime loop). Be warned: this adds significant elevation gain and several hours (1+ hours one way) to your day. It's a demanding ascent, but offers a true sense of accomplishment.
- The Toll Road: The most common way to access the starting point is via a toll road that leads directly to the large parking area at Rifugio Auronzo. This road is expensive (expect to pay around €30-€45 for a car/campervan for the day), but it saves you a huge uphill trek.
- Overnight Stay (Campervans): If you pay the toll for a campervan, you are often permitted to stay overnight in the car park at Rifugio Auronzo. This is a fantastic option, allowing you to experience sunset and sunrise over the Tre Cime without the crowds.
- Crowds: Tre Cime is incredibly popular. Arrive early (before 8 AM) or late in the day (after 4 PM), especially during peak season, to avoid the largest crowds.
2. Lago di Braies: The Jewel of the Dolomites

Lago di Braies (Pragser Wildsee) is so picturesque, it often feels like a scene from a fairytale. Its emerald-green waters, framed by dramatic peaks and an iconic boathouse, have made it one of the most photographed lakes in the world but it is onw of those places that does absoluteley live up to expectations.
So, be prepared to share this spot with other people and especially with photographers and models
The Classic Loop: Around the Lake Shore
- Starting Point: The main parking areas near the lake, there are a few different car parks to chose from.
- Distance: Approximately 3.6 km (2.2 miles) for the full loop.
- Elevation Gain/Loss: Minimal (less than 100 meters / 330 feet). The path is mostly flat.
- Difficulty: Easy. Suitable for all fitness levels, including families with young children. Some sections on the eastern side can be a bit narrower and rocky, but generally very manageable.
- Time: Allow 1.5-2 hours for a leisurely stroll.
The Experience: A gentle, almost flat circular walk around the lake takes about 1.5-2 hours and offers ever-changing perspectives of its beauty. You can also hire a traditional rowing boat to glide across the serene waters, an unforgettable way to soak in the atmosphere.
Beyond the Shores (Mountain Hikes): While the lake walk is beautiful, Lago di Braies also serves as a trailhead for more challenging hikes up into the surrounding mountains. For experienced hikers, trails lead towards peaks like:
- Seekofel (Croda del Becco) / Pragser Seekofel (via Alta Via 1): This is a challenging full-day hike. Expect distance of 12-15 km (7.5-9.3 miles) and elevation gain of 1,000-1,200 meters (3,300-3,900 feet). Difficulty is Strenuous, involving steep ascents and rocky terrain.
- Dürrensteinhütte / Strudelkopf: A more moderate option, often around 8-10 km (5-6 miles) return with 400-600 meters (1,300-2,000 feet) of elevation gain. Difficulty is Moderate to Challenging depending on the exact route, still delivering incredible vistas.
Insider Tips for Visiting Lago di Braies:
- Parking & Access: Parking here is expensive (expect to pay €10-€20 for a few hours, more for the day). It can be very challenging, especially for campervans, as space is limited and restrictions are often in place. During peak times (mid-summer), access roads may even be closed to private vehicles once parking lots are full, requiring you to park further away and take a shuttle bus. Always check official website for current access rules and booking requirements.
- Beat the Crowds: Arrive as early as possible in the morning (think sunrise or even sunset, which is what we did) to experience the lake in tranquility and avoid the inevitable photoshoots that flock to this spot. The early light is also magical for photography.

Dolomites road trip planned for you?
Dreaming of driving through the incredible Dolomites? We've done all the hard work, so you don't have to.
Our Dolomites Campervan Road Trip Guide gives you all the details you need: day-by-day locations, must-see stops, and practical advice. No research, no stress – just pure adventure through these majestic mountains and serene lakes.
Price: £11.99
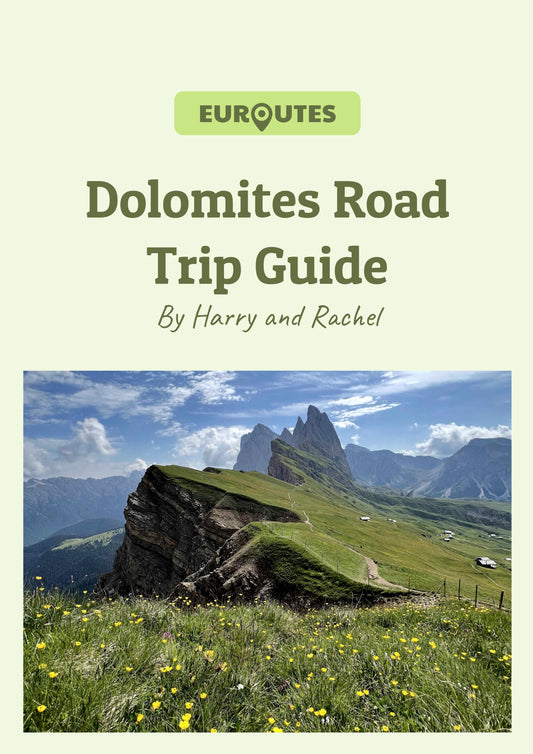
Shop now3. Seceda: The Ridge of the Dolomites

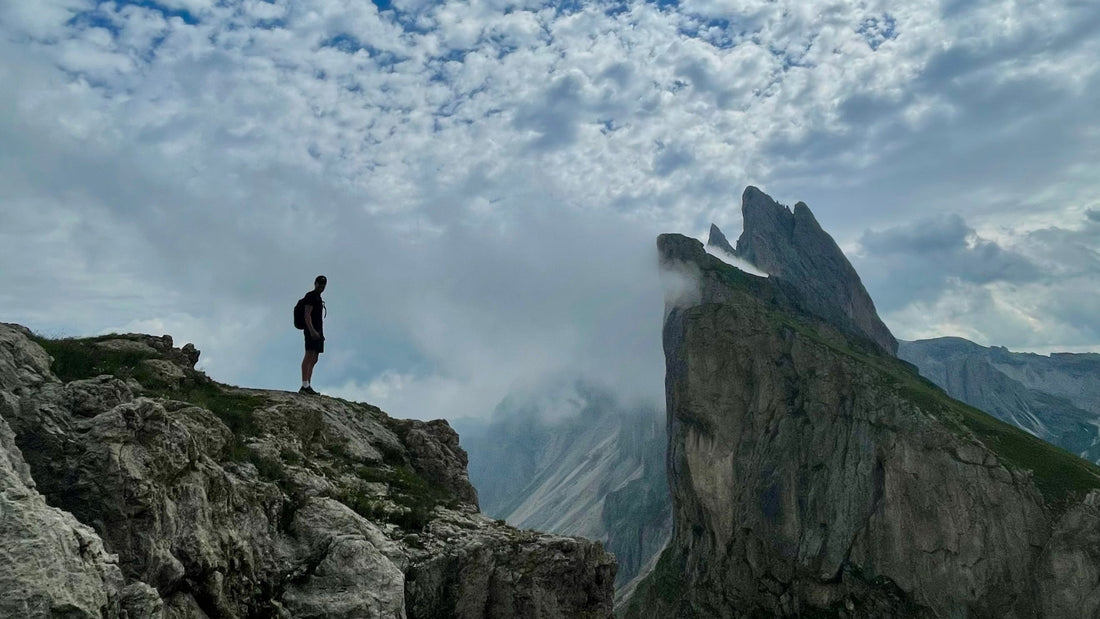
Seceda offers perhaps the most dramatic and unique ridge line in the Dolomites, resembling a giant, jagged blade cutting into the sky. The views from the top are simply staggering.
The Ridge Walk & Pieralongia Loop
- Starting Point: Top of the Seceda cable car station (accessed from Ortisei).
- Distance: Approximately 6-8 km (3.7-5 miles) for the main ridge walk and the loop towards Pieralongia.
- Elevation Gain/Loss: Around 200-300 meters (650-1,000 feet) total, as the path has gentle undulations.
- Difficulty: Easy to Moderate. The path is generally wide and well-maintained. There are some gentle ascents but nothing overly strenuous, making it accessible for most hikers.
- Time: Allow 2-3 hours, plus stops for photos and lunch at the refuge.
Accessing Seceda: While you can hike from the valley floor (e.g., from Ortisei), it's a significant and strenuous climb (around 1,200-1,400 meters / 3,900-4,600 feet of elevation gain over 10-12 km). For most visitors, especially those wanting to save energy for exploring the top, the cable car is the far easier and recommended option. It's a two-stage journey from Ortisei, ascending rapidly to the high alpine pasture. It will set you back €39 to take the cable car but it's worth it because you will have the energy to hike around at the top too.
At the Top: Once at the top station, you'll be greeted by an incredible viewpoint with a breathtaking panorama of the Odle/Geisler peaks and the surrounding Dolomites. There's also a café where you can enjoy refreshments with a view.
Beyond the Viewpoint (Our Recommendation): Don't just stop at the main viewpoint! We highly recommend a leisurely and incredibly scenic walk along the ridgeline and down towards the Pieralongia area.
This path is mostly downhill or flat after the initial ridge, passing through stunning green pastures. You'll pass a lovely refuge (often named Malga Pieralongia) where you can stop for a well-deserved lunch, enjoying traditional South Tyrolean cuisine with unbeatable views. This loop offers a fantastic blend of dramatic vistas and serene alpine meadows.
We always say the Dolomites are paradise for hikers, there's no mountain destination quite like it, so lace up your hiking boots and prepare to be wowed!
If you're looking for some tips on how to plan an epic Dolomites road trip, check out our blog below